Well, while I'm in the picture-less world that I currently live in, I figure I can write something cooking-related that does not require pictures. Specifically, I'd like to provide a few guidelines I've observed and employed when marinating meat (you marinate something, the something you marinate with is a marinade). I've been meaning to do something along these lines for a while, so I figure why not now?
What is a marinade? A marinade is basically a flavor-inducing liquid, that can also tenderize or alter the texture (e.g., by caramelizing) of the final product. They can be used for grilling (my preferred application), baking, braising, stewing, steaming (in the case of fish) frying, or virtually any food preparation technique. However, certain marinades lend themselves to some preparations more than others. For example, a sugary marinade that is likely to caramelize when heated might be better suited for the grill or oven than for a pan-fry preparation (at least for thicker cuts of meat that would need to be fried for more than a few minutes).
What's in a marinade? Well, it depends, really. Marinades almost always have some sort of an acid, but the other ingredients can vary widely. Below are some of the more common elements I've noticed in marinades.
Acid: Adds flavor and helps with tenderizing the meat. Examples include citrus juice, vinegars, or alcohol (typically wine). Depending on the style of food, different acids might be appropriate. For example, with for stir-fry or other Asian-inspired marinades, I often use rice wine vinegar or lemon juice (note - a stir-fry sauce can sometimes be a marinade recipe with corn starch added for thickening (added at the end of cooking)). For Mexican dishes, I often use lime juice. For Italian, I often use balsamic vinegar (go lightly - it packs a lot of flavor) or lemon juice. If you're planning to de glace a meat dish using wine (e.g., when making stew), using some of the wine in the marinade is a good choice.
Fat: Perhaps not as essential as an acid, fats can still be very important in a marinade. This is because some flavors (see below) are not water soluble, and instead need to be carried into the meat by a fat (e.g., capsaisin - the spicy ingredient in hot peppers). I typically use either a neutral oil that can withstand high heat (many vegetable/grain oils qualify) or an oil that can itself impart some flavor (e.g., olive oil). The choice depends on the specific type of food (e.g., you probably wouldn't use olive oil for a stir-fry) as well as the cooking method (if you're going with a high-heat cooking method, it may be best to use an oil that can tolerate high heats).
Flavor: When it comes down to it, a marinade is often defined by the flavorings that are added. Sometimes I use combinations of herbs and spices that are tried and true (e.g., herbes de provence) and sometimes I get creative. Herbs and spices are the most obvious flavorings, but others are important to keep in mind. For example, the vinegars and fats can bring a lot of flavor, as can things like garlic and ginger or other liquids you bring into the marinade (e.g., soy or Worcestershire sauce). If you are using a pre-mixed herb/spice combination (e.g., jerk seasoning, herbes de provence), be sure to get one that doesn't contain salt. Salt certainly helps to enhance flavors, but you can add that yourself. There's no sense paying a lot of money for a flavoring that contains salt when salt is available so cheaply on its own.
Sugars: Sugars can help enhance both flavor and texture. Sugars generally caramelize at high temperatures, which can be a good or a bad thing, depending on your goals. If you're afraid of burning the sugars, you can marinate the meat in a sugar-less marinade, and withold some of the marinade. Then, add the sugar of your choice, and brush it on the meat toward the end of cooking. Think BBQ sauce (which typically contains a sugar, such as molasses or brown sugar) - quite often it is best added towards the end of grilling to get a nice carmalized BBQ flavor, without charring on the grill.
Putting it all together: Make your marinade in a blender or food processor to fully integrate (i.e., emulsify) hydrophillic (water soluble) and hydrophobic (fat-soluble) ingredients and to chop up ingredients like garlic, ginger, green onions, hot peppers, and so forth. Marinate your meat in a plastic bag in the refrigerator (placed into another bowl to catch any leaks) for at least 30-minutes before cooking.
Remember that different combinations of these ingredients can result in wildly different flavors. I've used lemon, lime, and orange juices for Asian and Italian dishes alike, but different "flavors" and fats can distinguish the dishes. Feel free to be creative in combining flavors. For example, I made a stir-fry the other day that used rice wine vinegar, soy sauce, curry powder, cayenne pepper, and corn starch for the sauce that was very good. Adding cumin, garlic, and ground up jalepeño peppers to lime juice and soy sauce creates a classic tex-mex flavor. Pair flavors from similar regions of the world (e.g., French wine and herbes de provence, soy sauce, rice wine vinegar, and ginger).
Also, marinating is not just for meat. I will often marinate fruits and vegetables that I'm planning to cook on the grill (mushrooms, zucchini, asparagus, pineapple).
Showing posts with label mexican. Show all posts
Showing posts with label mexican. Show all posts
Wednesday, October 1, 2008
Sunday, August 24, 2008
Chicken Fajita Marinade
Over the past two years, I've been trying a variety of marinades for fajitas. Some have been quite good, while others have been disappointing. Below is the recipe that has become my favorite thus far. It is very easy, but the combination of flavors hits me just right. You can modify this as you choose (substituting chipotle peppers for a smoky flavor, using lemon instead of lime and reducing the sugar for fish tacos, etc.). I've used the recipe for chicken and pork, although I suspect it would work for other meats as well.
Chicken Fajita Marinade
Note: I don't have any pictures because I ran out of batteries for the camera.
Ingredients:
1/4 cup soy sauce
juice of 1 lime
1/4 cup soy sauce
2 tbsp brown sugar
3 cloves garlic, minced
1/2 tsp (or more) cumin
hot pepper flakes to taste
Directions:
Chicken Fajita Marinade
Note: I don't have any pictures because I ran out of batteries for the camera.
Ingredients:
1/4 cup soy sauce
juice of 1 lime
1/4 cup soy sauce
2 tbsp brown sugar
3 cloves garlic, minced
1/2 tsp (or more) cumin
hot pepper flakes to taste
Directions:
- Combine ingredients, mixing well
- Marinate chicken 1-4 hours
Wednesday, June 4, 2008
Salsa!
Sam recently posted her salsa recipe, and as she said, the recipe is a very rough guideline and open to a lot of improvisation. This time was the closest I've ever made it to her actual recipe. In the summer, typically go to the farmer's market and get whatever tomatoes and hot peppers look best that week (I don't like tomatoes unless they're ripe). Sometimes this means heirloom tomatoes (very sweet and juicy), sometimes I roast the hot peppers (poblano peppers seem to work well in this regard), sometimes I add in bell peppers, etc. Black beans and/or corn are also nice additions. Here is this week's attempt:
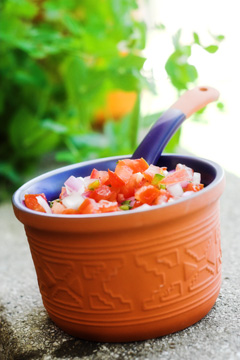
and a close up...

looks pretty good, eh? I heap this stuff on my tortilla chips - a lot more than I can say for store-bought salsa. The recipe below reflects what I did this time...
Sam's Salsa
Ingredients:
4 medium tomatoes, seeded
2 cloves garlic
1/2 red onion
1 serrano pepper, seeded
1 jalepeño pepper, seeded
juice of one lime
Fresh basil leaves
Fresh ground pepper and Kosher salt, to taste
Directions:
Chop ingredients, and combine. Chill for at least an hour to let flavors co-mingle.
and a close up...
looks pretty good, eh? I heap this stuff on my tortilla chips - a lot more than I can say for store-bought salsa. The recipe below reflects what I did this time...
Sam's Salsa
Ingredients:
4 medium tomatoes, seeded
2 cloves garlic
1/2 red onion
1 serrano pepper, seeded
1 jalepeño pepper, seeded
juice of one lime
Fresh basil leaves
Fresh ground pepper and Kosher salt, to taste
Directions:
Chop ingredients, and combine. Chill for at least an hour to let flavors co-mingle.
Monday, May 12, 2008
Its the sauce
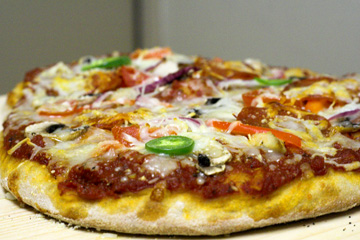
I made homemade pizza earlier this week. The basic crust recipe I used was very simple - basically flour, water, honey, oil, and salt (see below), and a good crust is an important part of a good pizza. However, I feel that a good sauce is critical to the flavor of a good pizza. I typically make enough sauce for at least two batches of dough, and sometimes more than that.
For the sauce, I begin with a large can of crushed tomatoes. This is heated in a saucepan over medium heat with 3 cloves of minced garlic, about a quarter cup of olive oil, a tablespoon (approximate) of oregano, a teaspoon each of basil and rosemary, salt, pepper, and cayenne pepper to taste. After about 15-minutes I let it cool a bit before using it (I usually do this while the dough is rising).
This is what the pizza might look like (this one has red onions and peppers, chicken, mushrooms, tomatoes, jalapeño peppers, an pepperoni - Z's had bacon, asparagus, and broccoli in place of the pepperoni and chicken).
With the leftover dough, I decided to take advantage of other leftovers and combined them into a new treat - Mexican pizza. We'd made Mexican lasagna earlier in the week, and had some left over sauce (tomatoes, ground beef, black beans, onions, chili powder, cumin, etc.). So, I used this as my pizza sauce (mixed with a little of the sauce above to thin it out), replaced the mozzarella cheese with cheddar, and threw on some of the left over toppings from the night before (jalapeño pepper bits, red onions and peppers, and mushrooms), creating Mexican pizza. This probably was not one of my favorite dishes of all time, but it was a good way to get rid of leftovers, while still being friendly to the taste buds.

Finally, a note on a project Z has been working on for the past week or so. She organized our collection of recipes into two handy binders. The binders a both filled to the brim with recipes, and the clear sheet protectors are very nice (keeps me from getting the recipes too messy in the kitchen). This was a lot of work, as our recipes were not really organized in any sensible way - we each had some recipes in our own "storage systems" (boxes or folders that were not organized in any way), plus she recently cut out a lot of recipes from magazines so that she could get rid of the magazines. Here are the binders:
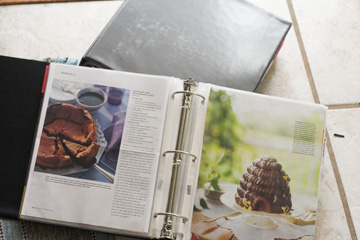
As I said, the organization has been wonderful - we've already taken advantage of having these recipes at our finger tips, and have also reminded ourselves what all we could possibly make (I guess no excuse now for having no ideas for dinner).
Pizza Dough Recipe (adapted from the Bread Bible, one of the best books on the topic):
Ingredients
1 to 1-1/2 cups warm water
1-tablespoon yeast
2-tablespoons honey
1/2 cup whole wheat flour
2-3 cups bread flour (can also add wheat gluten to increase the protein content of all-purpose flour)
1/4 cup olive oil
salt to taste
Directions
Add water, yeast, honey, and a dusting of flour to a large bowl to let the yeast activate - about 15 minutes. Mix in the salt, olive oil, and 1-cup flour. Gradually add in additional flour until
you've got a sticky dough. Move to a flat, floured work surface and knead for a while, gradually adding flour as needed. You're looking for the dough to get relatively firm, but not as firm as you might for in a baguette dough (generally around 10-minutes, but probably much quicker if you have a stand mixer with a dough hook).
Place dough in a greased bowl to rise for about 90-minutes (cover with saran wrap or a wet towel). After the dough has risen, you could shape it for one large pizza, or multiple smaller ones (my typical option). Throw on the sauce, toppings of your choice, and cheese(s) and bake in a preheated over (as hot as your oven will go). Pizza is great because you can go simple with simple combinations like pepperoni and mushroom or tomato and fresh basil, or get more creative like the ones you find at artisan pizza places, using funky sauces and flavor combinations
A baking stone is something that will definitely make the pizza better - it gives the crust a nice crispiness that I absolutely love. If you're going to do this, once you've shaped your dough, place it on a pizza peel dusted in corn meal to transfer onto the pre-heated baking stone. On a baking stone, the pizzas don't take very long (6-10 minutes, perhaps more if you're going with a very thick crust), but they definitely take longer on a regular baking pan.
For the sauce, I begin with a large can of crushed tomatoes. This is heated in a saucepan over medium heat with 3 cloves of minced garlic, about a quarter cup of olive oil, a tablespoon (approximate) of oregano, a teaspoon each of basil and rosemary, salt, pepper, and cayenne pepper to taste. After about 15-minutes I let it cool a bit before using it (I usually do this while the dough is rising).
This is what the pizza might look like (this one has red onions and peppers, chicken, mushrooms, tomatoes, jalapeño peppers, an pepperoni - Z's had bacon, asparagus, and broccoli in place of the pepperoni and chicken).
With the leftover dough, I decided to take advantage of other leftovers and combined them into a new treat - Mexican pizza. We'd made Mexican lasagna earlier in the week, and had some left over sauce (tomatoes, ground beef, black beans, onions, chili powder, cumin, etc.). So, I used this as my pizza sauce (mixed with a little of the sauce above to thin it out), replaced the mozzarella cheese with cheddar, and threw on some of the left over toppings from the night before (jalapeño pepper bits, red onions and peppers, and mushrooms), creating Mexican pizza. This probably was not one of my favorite dishes of all time, but it was a good way to get rid of leftovers, while still being friendly to the taste buds.
Finally, a note on a project Z has been working on for the past week or so. She organized our collection of recipes into two handy binders. The binders a both filled to the brim with recipes, and the clear sheet protectors are very nice (keeps me from getting the recipes too messy in the kitchen). This was a lot of work, as our recipes were not really organized in any sensible way - we each had some recipes in our own "storage systems" (boxes or folders that were not organized in any way), plus she recently cut out a lot of recipes from magazines so that she could get rid of the magazines. Here are the binders:
As I said, the organization has been wonderful - we've already taken advantage of having these recipes at our finger tips, and have also reminded ourselves what all we could possibly make (I guess no excuse now for having no ideas for dinner).
Pizza Dough Recipe (adapted from the Bread Bible, one of the best books on the topic):
Ingredients
1 to 1-1/2 cups warm water
1-tablespoon yeast
2-tablespoons honey
1/2 cup whole wheat flour
2-3 cups bread flour (can also add wheat gluten to increase the protein content of all-purpose flour)
1/4 cup olive oil
salt to taste
Directions
Add water, yeast, honey, and a dusting of flour to a large bowl to let the yeast activate - about 15 minutes. Mix in the salt, olive oil, and 1-cup flour. Gradually add in additional flour until
you've got a sticky dough. Move to a flat, floured work surface and knead for a while, gradually adding flour as needed. You're looking for the dough to get relatively firm, but not as firm as you might for in a baguette dough (generally around 10-minutes, but probably much quicker if you have a stand mixer with a dough hook).
Place dough in a greased bowl to rise for about 90-minutes (cover with saran wrap or a wet towel). After the dough has risen, you could shape it for one large pizza, or multiple smaller ones (my typical option). Throw on the sauce, toppings of your choice, and cheese(s) and bake in a preheated over (as hot as your oven will go). Pizza is great because you can go simple with simple combinations like pepperoni and mushroom or tomato and fresh basil, or get more creative like the ones you find at artisan pizza places, using funky sauces and flavor combinations
A baking stone is something that will definitely make the pizza better - it gives the crust a nice crispiness that I absolutely love. If you're going to do this, once you've shaped your dough, place it on a pizza peel dusted in corn meal to transfer onto the pre-heated baking stone. On a baking stone, the pizzas don't take very long (6-10 minutes, perhaps more if you're going with a very thick crust), but they definitely take longer on a regular baking pan.
Thursday, May 8, 2008
Guacamole
Last week, Z made some guacamole that I thought I'd share with everyone (AKA, Z, Jenny, and Z's parents). She was a little sketchy on the recipe details, but I believe it involved 3 avocados (mashed up), around 2 tablespoons of sour cream, a little red onion, cherry tomatoes, salt, pepper, and either garlic, cayenne, or some sort of spice (this I gathered from her description of the process - admittedly, I asked her quite some time she'd made it). It turned out very nicely, and looks quite good.

Unfortunately, I'm not a huge avocado fan, so the guacamole was lost on me, but she was very happy with it, and her coworkers enjoyed it a lot as well.
During our first trip to the Twisted Vine (when we picked up the Pinot Gris I mentioned last time), I mentioned that we went a little crazy purchasing wines (you can read all about it here). One of the delicious items we got was this port from Ferreira.
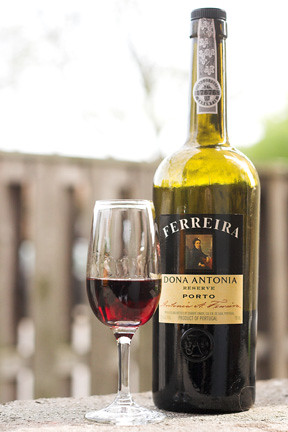
The woman at the wine store recommended this as a good, inexpensive port, and it didn't disappoint. We actually opened this bottle sometime late last month, so I'll admit my memory is a little hazy on the details of its taste. I am fairly confident that it tasted like a port :). I remember being pleasantly surprised, because the last time we tried a "good deal" bottle of port, we were terribly disappointed.
Unfortunately, I'm not a huge avocado fan, so the guacamole was lost on me, but she was very happy with it, and her coworkers enjoyed it a lot as well.
During our first trip to the Twisted Vine (when we picked up the Pinot Gris I mentioned last time), I mentioned that we went a little crazy purchasing wines (you can read all about it here). One of the delicious items we got was this port from Ferreira.
The woman at the wine store recommended this as a good, inexpensive port, and it didn't disappoint. We actually opened this bottle sometime late last month, so I'll admit my memory is a little hazy on the details of its taste. I am fairly confident that it tasted like a port :). I remember being pleasantly surprised, because the last time we tried a "good deal" bottle of port, we were terribly disappointed.
Subscribe to:
Posts (Atom)